I have an early Christmas present for you, I finally finished writing the tutorial for the Anthropologie Cirrus DIY duvet cover that I made this summer. Yay! So without further ado, here is my tutorial for the duvet cover:

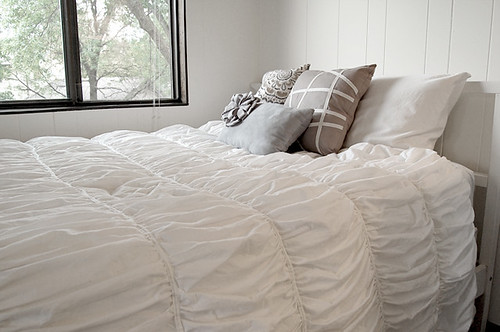
Anthropologie Cirrus Bedding
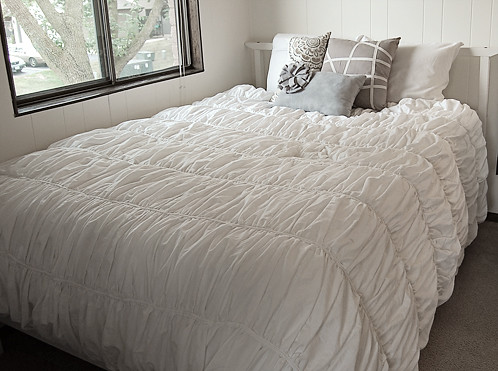
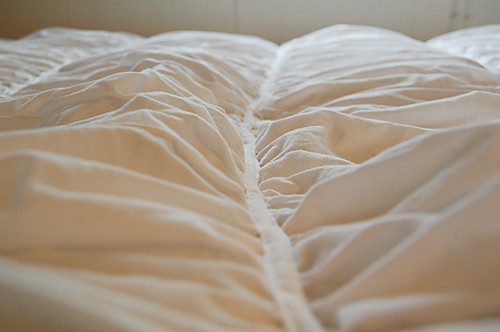
My version
This tutorial is made to fit a full/queen sized comforter measuring 88 x 88 inches. Measure your comforter and adjust measurements to fit.
Materials:
2 king size flat sheets
1 queen size flat sheet (for reverse side of duvet)
matching thread
sewing machine
double needle – optional
some sort of closure, I used 3 yards of lace to create ties but buttons or snaps can be used

Sheets at Target about $15-$20 each depending on size
- First measure the duvet that will fit inside the cover to determine the size. Double the width (or more if you want a ton of gathers) and add an inch to both length and width to allow for seam allowance. My comforter was 88 x 88” so the measurements were 89” length by 177” width
- Wash and iron/steam the sheets to prepare them

I found the easiest way to get the wrinkles out is to hang the sheets up and steam them.
- Sew the 2 king size sheets together lengthwise
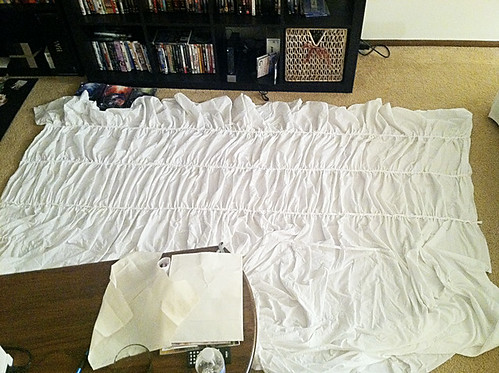
- Press the seam and spread out the sheets on a very large surface (like the floor) wrong side facing up
- Cut out the measurement that you took for the comforter so you have a piece of material 89 x 177” with the seam running the long way down the center. Save the extra fabric for use later!
- Divide the panel into 8 section horizontally, about 11” apart. It’s easier to pick a round number and have a little extra/less on the ends than trying to measure something like 11.362 inches between each section. Save yourself some headaches, you won’t be able to tell when it’s finished anyway
- Draw the lines on the wrong side of the fabric marking where the gathers will go

Mark on wrong side with pencil
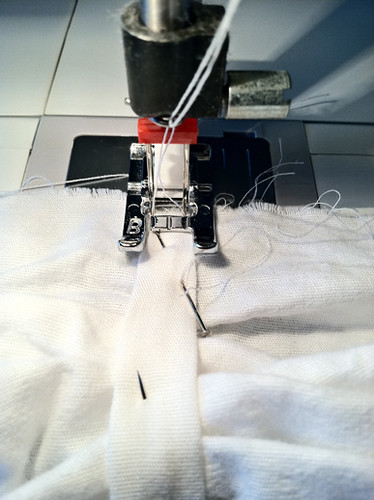
- Sew down the lines with a basting stitch, leaving a few inches of thread hanging on each side
- Also baste along the top and bottom of the sheet with a ¼” seam allowance
- Gently pull one of the threads to gather the sheet to the proper width. (Mine was 89 inches, remember to include room for the seam allowance)
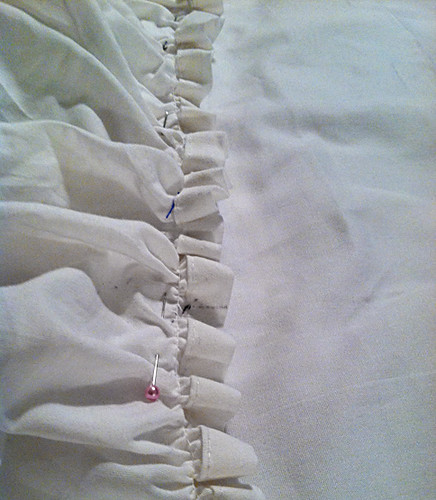
Pin down the strips over the gathered seams
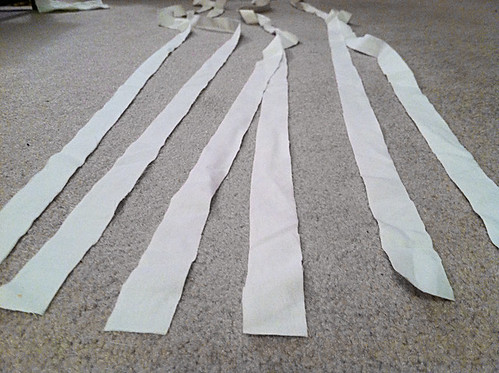
Part 2: The Strips
- If you get bored sewing straight lines and gathering, you can start making the strips that will be sewn on top of the gathers to hold them in place. These will run the width of the comforter so use the width measurement again
- Cut 7 strips 1” wide by 89” long (or whatever the width of your duvet will be)
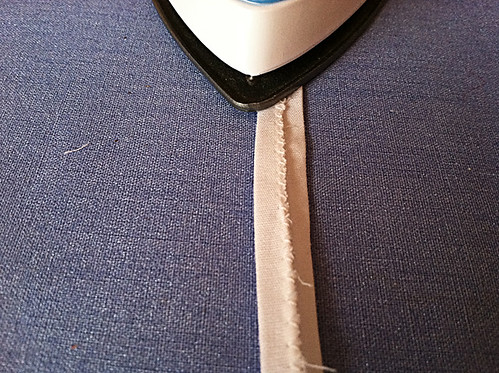
- Fold each strip in half lengthwise and sew together. I found using a zig zag stitch about ¼” from the edge was most effective and least stressful

- Press the strips so the seam is in the center
- Flip the strips over so the seam is facing down and lay on top of the gathered rows, but not the top or the bottom. Pin in place

- Sew the strips down. I found the best way to do this was to buy a double needle attachment for my sewing machine so I only had to do one pass, but if you don’t have one you can sew a narrow seam on one edge of the strip, and then go back and sew a narrow seam on the other edge
Part 3: The Back Panel
- Cut the remaining sheet to the proper length of the comforter (again, mine was 89 x 89” including seam allowance
- Take the extra fabric from the first two sheets. There should be enough left over to make a top panel. I made the top panel 1½ feet long by 89” wide
- Sew a 3” hem on one end. This will overlap the bottom panel and be tied together to hold the duvet inside
- Lay the front panel right side up on the ground. Decide which end will be the top and lay the top panel wrong side up on top of it with the sides matching. Lay the bottom part of the back panel even with the bottom and sides of the front panel, wrong side up. Pin ½” from the edge all the way around the duvet cover to hold everything together
- Sew around entire cover
Part 4: Closures
- Decide how you want to have the cover close. I decided to do 5 lace ties
- I measured 14” between each tie and pinned a 6” strip of lace to the back sides of the back top and bottom panels
- Sew down the ties (or if you’re really ambitions, create button holes and attach buttons)
- Flip inside out and stuff your duvet inside. Tie the lace into pretty bows
And you're done!
I hope that was clear enough to help, please feel free to ask any questions you might have while making it!
Linking up with East Coast Creative
Wow, Sarah Anne...very impressive tutorial - seems pretty clear to me! Like I said before, the duvet is absolutely beautiful! Since I can't sew to save my soul, I'm either gonna have to ask you to teach me or commission you!;-) Sending our love - have a happy day!
ReplyDeletethis is crazy! and you are crazy talented....
ReplyDeleteThank you very much!! It was time consuming (oh so very time consuming) but the actual sewing aspects were fairly simple. It's really just a gathering stitch and a straight stitch. So if you can stand to do that for hours on end, it's really not a difficult project.
ReplyDeleteThis is great! I would love to see a tutorial on how to make the bedskirt from the Georgina bedding set, which would go great with this duvet cover. It looks like it wouldnt be too difficult, but I'm not sure where I'd start. Thanks very much for sharing this DIY! :)
ReplyDeleteGeorgina bedding:
http://www.anthropologie.com/anthro/product/home-bedding/A093707.jsp
Thank you! You're right, that bedskirt is super cute. I bet it wouldn't be that hard to replicate!
DeleteOk so I'm getting ready to start this project tomorrow and need clarification. So when sewing the two sheets together I sew what would be the side of the sheets together and then when cutting the sheet to measurement of comforter I want to cut so the first seem will end up being where one of the gathering lines is? not sure if that made sense. when gathering is that original seem horizontal with the gathers or should it run from the head to the foot of the duvet, maybe that sounds clearer. ok, well can wait to try this and make it look like yours hopefully!
ReplyDeleteThanks for commenting! The seam should run vertically, from the head to the foot of the duvet and the gathers will be horizontal. Since it will be gathered, it's pretty easy to hide the seam. Does that help at all? Let me know if you have any more questions. Thanks and good luck!!
DeleteI just love this tutorial and I'm going to make it sometime in the next few weeks. :) I'm just slightly confused with how the top panel and back panel work. So is there basically one end of the back panel that is not sewn to the front panel? And instead, the top panel is sewn to the front panel and tied onto the free edge of the back panel? If any of that made sense... so when you sew it all together, one of the edges of the back panel will not be sewn to the top panel, right? :) Thanks again for the awesome tutorial!
ReplyDeleteHi Kenzie, so sorry I didn't get to your comment sooner - it got caught in my spam filter. I hope I'm still in time to help you make the duvet!
DeleteOk about the panels, you are correct. I know, it's hard to describe without a picture, but think of it like a pillow sham. The front of the duvet is laying on the ground, right side up. Then you lay the the bottom panel (right side down) on top of it, matching up the sides and bottom of the 2 layers. The bottom panel won't be as tall as the front panel. Sew the sides and bottom of the 2 panels. Then lay the shorter top panel (right side down) on the other layers, matching the tops of the front panel and top panel. Sew around the sides and top. This will leave a giant space to put the comforter inside.
Does that make any sense? If you need more advice, feel free to email me at neroliblossomsblog [at] gmail [dot] com and I can try to make things a bit clearer.
Good luck!!
Hi! I am working on this duvet this week, and I just have a couple questions. At the beginning when you sew 2 sheets together lengthwise, you are talking about side by side right? And for these you are using the queen sheets I buy correct? Will I have extra fabric after I do this? Or do I get all of the extra fabric from the king sheet I buy? That is where I am confused also, is the king sheet what I use for the strips? I can't wait to try this!
ReplyDeleteHi Rachael, welcome to my blog! To answer your questions, yes you sew the sheets together side by side. I used the 2 king sheets for that so you will have enough width to gather and have some left over for the strips. I used 2 king sheets sewn together side by side, and a queen sheet for the back. Does this help at all? If not, feel free to comment again or email me at neroliblossomsblog [at] gmail [dot] com
DeleteHi! Thanks for this DIY, I've been looking at the (expensive) Anthro verison ever since it came out!
ReplyDeleteI'm thinking about making this for my college dorm, but I have a few questions.
If I wanted to make this but without the comforter insert, should I still use the two king size sheets?
Hi! The sheets all depend on the size of bed you are making the duvet for. If you're in a college dorm, I'm guessing you have a twin size bed, correct? In that case, you could use 1 king sheet, or 2 twin sheets. Just double the size of your bed so you get enough material to gather.
DeleteYou make this seam (pun, hehe) easy! I can't sew, but this is soo horgeous! You should make more and sell them! :) they sell theirs for $400! Can you believe that!?
ReplyDeleteWow! That looks amazing! Your tutorial is very specific and helpful. Thank you!
ReplyDeleteSara
Thanks Sara, I'm glad you liked it!
DeleteI'm confused, the instructions call for two king size sheets and one queen.
ReplyDeleteIn the instructions, it says you sew two king size sheets together for the gathers.
Then at the end, it says take the remaining king size sheet. Shouldn't it be a queen???
You're absolutely right, I can't believe I didn't catch that. I've edited the tutorial so it just says to use the last sheet. The king sheets were definitely used for the front, and the back was the queen sheet. Thanks for pointing that out!
DeleteDumb this down for me for a king.... Are my options limited to at most a queen for this?
ReplyDeleteYou can definitely tweak this to make a king sized duvet. The only issue you'll run into with these instructions is possible lack of fabric. 2 solutions to that.
ReplyDelete1. Use 2 king size sheets for the front panel and a Cal King size sheet for the back panel. Cut the Cal King sheet down to size and use the extra fabric to make the strips and the back closure flap. I haven't done this so I can't guaranty if you'll have enough fabric.
Option 2. Use 2 king size sheets for the front panel, one king size sheet for the back panel, and buy an additional twin size sheet to cut strips and back closure flap.
You could also get like a half yard of 120 in muslin at a fabric store for the strips. But if you are going to do that you might as well go all the way and save your self some time get a few packages of bias tape.
DeleteYou could also go the craft store and get about a half yard of 120 in muslin to make the strips. But if you are already going to the craft store you might as well get some bias tape and save yourself some time.
DeleteI think for mine I'd use some lace hem tape or 1" lace trim to make it extra pretty.
I'm thinking about making this for my dorm room and I was wondering how long it would take me to make it (from start to finish, assuming I didn't take any breaks)? I'm a beginner at sewing but I think I'll be able to get help from someone who has at least a little bit of experience with sewing.
ReplyDeleteThanks!
Hi, that seems like a simple question, but it's a hard one to answer! I really don't know how long it will take you since it will be different for everyone. Unfortunately I can't even tell you how long it took me to make mine, since I didn't think to keep track. Lots of little things can affect how long it will take. How fast you sew, if you have help, how many times the thread breaks, how bored you get of sewing in a straight line ;-)
DeleteI can tell you that this will take quite a few hours. I don't think it's something you could get done in a day, especially if you're fairly new to sewing. Maybe a weekend if you didn't stop? I did mine little by little over the course of a few months, but if I were to do it again, I would put aside at least 2 full weekends to work on it.
Hi, Sarah! I was poking around for room essentials sheets in a blue and found 2 king ones I like, but not another two to make a king duvet. This leaves me with a bit of a conundrum you may be able to help with. Was it just the price point versus quality that had you using RE sheets? Do you think any reasonably quality sheet would work? Thanks! Julianna
ReplyDeleteHi Julianna,
DeleteThe ONLY reason I bought the RE sheets from Target was because they were cheap. Any flat sheet will do. You can even make them out of jersey if you'd like, but mine are just the plain cotton low quality cheapo sheets. You can make them out of higher quality sheets and I'm sure it would make the duvet even nicer!
Thank you! I had my eye on some pale, out of stock RE sheets on eBay and they sold out in like an hour. In my depression (lol) I came back here to ask you about that. It looks like Target has replaced RE sheet separates with Threshold. I need to go feel them, but I have a feeling they are comparable and will work just fine. My hopes of getting a pale blue comforter made, though, are being crushed as it's such a hard color to find now. I think I may go for pale grey instead-- as it is pretty neutral and can match a variety of bedsheets, paints, and woods for a bedroom.
DeleteSarah, I have another question or two... I see another tutorial where they used a ruffler foot on the sewing machine-- although you just gathered yourself. Do you think it matters? The duvet I want to make is 123"x115" to cover a bed that is a bit bigger than a king. The main worry I have is accidentally snapping a long thread that spans that length. There is a third tutorial I saw where they did the gathers as strips and then joined them to the straight strip part like piecing a quilt if that makes sense. I had considered that as well.
DeleteAlso, when sewing the strips on do you think it would be more beneficial to sew the top and bottom of the strip to doubly reinforce the ruffling? Has yours held up well?
Thanks for your patience!
There are several ways to do the gathers. When I did mine, the thread did actually snap a few times. I just tied it back together and moved on. You do need to be careful, since that will lock in the gathers for that area since the fabric won't slide easily over the knot. But the idea you had of doing the gathers as strips would probably work well too. Let me know how it goes if you decide to do it that way!
DeleteAs for reinforcing the strips, mine has held up well so far, although I have yet to wash it (I've been putting it off since I'm afraid to ruin it). When you sew the strips down, it reinforces the gathers naturally, since you're putting another row of stitches on top of it.
Hi, I just saw your tutorial and can't wait to get the materials and make one myself! One thing that would help prevent thread breakage when you are making your gathers is to use a heavier specialty thread such as quilting or buttonhole thread (or even unwaxed dental floss!). These are much stronger and can handle the pulling better than regular (even heavy duty) threads.
DeleteLove your tutorial and can't wait to get materials to make my own! I have a suggestion about the problem with thread breaking while pulling the gathers. Use specialty thread like quilting or buttonhole for this. They are both much stronger and smoother due to being made with longer fibers. This enables them to glide through the material, and handle the tension from pulling, much better. Another option is unwaxed dental floss! Super strong!
DeleteFantastic idea about the heavy duty thread or dental floss! I just used what I had on hand, but I'm making a note for any future projects to check that out. It sounds like it would be a lot easier if the thread was stronger.
DeleteFirst off, I LOVE this tutorial! Gorgeous finished product and the step-by-step instructions seem very easy to follow.
ReplyDeleteI am planning on making this within the next two weeks, and the only part I'm confused about is the measurements and materials needed. I will be making this for my dorm room's XL Twin bed. Should I use two Full sheets and an XL Twin, two Queen sheets and an XL Twin, or two King Sheets and an XL Twin? I love the fullness of your duvet and I would like to imitate that.
Also, I will be using an old comforter in lieu of an actual duvet (college student budget!) and I need to line the top so the color doesn't show through - I will use an additional XL Twin sheet for that, correct?
Thank you!
For the material, just measure the width of the comforter you're using and double that measurement. It will probably end up being somewhere around the size of a king sheet. If that's the case, you can just use one king sheet and you don't need to join anything together! If not, you can use 2 XL twin sheets. The fullness I have is from doubling the measurement of my duvet, so as long as you do that, you'll get the same effect.
DeleteYes, you will probably have to line the comforter. You can most likely use another XL twin sheet as a lining. Just make sure you measure everything so you have enough fabric to cover the comforter. So you'll use one XL twin sheet, for the back, 1 XL twin sheet for the front lining, and either a king or 2 XL twin sheets for the gathered ruffled part. Make sense?
wow! This is really nice. Would love to have one, but don't want to make a commitment to that much time. You did a great job on your tutorial! I thought it was very clear, and if I'm saving it just in case I change my mind. THANKS
ReplyDeletelovely!
ReplyDeleteAbsolutely stunning!! I really love the tutorial & pics!! You did a fabulous job Sarah!
ReplyDeleteMy intention is to give this DIY a try in a few weeks although I'm wondering what size sheets to use when trying to make a King Size cover?? (2 King Sized Sheets + 1 another King Sized for the back panel?) also, are the strips also cut from the excess fabric? (as would be my guess)...
Also, thought I would mention to those not wanting to brave the time commitment - I found the exact same Duvet Cover being sold at Bed Bath & Beyond (with matching Pillow Shams sold seperately) for something like $150-220 depending on size needed!! I believe the colours come in light pink, white and possibly grey and light blue...
Thank you for your help in advance Sarah!!
Ps. Keep up the fabulous DIY tutorials!!
It looks so pretty! So impressed.
ReplyDeleteI would absolutely love for you to share the post at Empty Your Archive - this week we are sharing posts on bed linen, Alice @ Mums Make Lists
http://mumsmakelists.blogspot.co.uk/2013/10/empty-your-archive-27.html
Thanks for your sweet comments Alice, I'll definitely head over there and link up!
DeleteJust beautiful!
ReplyDeleteAnne xx
Hi! I really wanted to make this for my bed but wasn't sure what size bed sheets I would need for my twin bed. Would it be 2 queen size flat sheets and 1 twin size flat sheet for the reverse side? Thanks! ~Suzie
ReplyDeleteHi Susan, for a twin bed, you can use 2 full size sheets for the front and 1 twin size sheet for the back. You don't need to use the queen size unless you want it super gathered. The full size should be fine.
DeleteHi. I'm going to be a freshman in the fall. And, I have not liked any of the expensive comforters in the stores. So, I thought I'd try my hand and this. I haven't sewed something for years. Is this something that a beginner could manage? Also, I need XL sheets so would I need to change the dimensions of this to smaller or would it be fine? Thanks so much.
ReplyDeleteMeasure your comforter and adjust measurements to fit. Materials: ... ikingduvetcoverset.blogspot.com
ReplyDeleteHi. Wouldn't you save time if you used 1/4" elastic to do the gathers instead of using basting?
ReplyDeleteEasy way to ruffle is to crank up the tension
ReplyDeletehttp://www.iheartnaptime.net/how-to-sew-a-ruffle-four-methods/