Showing posts with label house. Show all posts

Master bedroom update - floors and walls

Monday, June 29, 2015

We've finally been able to move back into the master bedroom! The flooring has been installed and the walls are painted. We have a ways to go before this room is finished, but at least we're not camping out in the guest bedroom surrounded by unpacked boxes anymore. The change has been like night and day for this room. What started out as a stuffy, cave like master bedroom now feels open and cool (as opposed to outside where it's 110 degrees). We still need to hang curtains since the sun shines right in that window at 5 am, as well as installing baseboards. But overall, I'm loving how this room is coming along! 


Take a look at what we started with when we moved in:


This room was absolutely filthy when we moved in. The 2 other bedrooms have carpeting and when we got those cleaned, the carpet cleaners took one look at the master and basically said "yeah, we're not even going to clean this, you need to rip it out". Which was fine by me! We decided to go with laminate flooring instead of wood since we have a large dog and the laminate should hold up better and not get scratched like wood floors. We also had to clean all the walls as they were covered with dog hair and dust. 

Getting the floors installed was a process and a half. We really weren't happy with the customer service of company we went with, but the floors look amazing now that they're done and the quality is great. They look and feel pretty close to real wood. We still need to install the baseboards, but I'm just so happy to actually have my room and closet back! 

We also changed the walls from the dark green cavelike atmosphere to Benjamin Moore's White Dove to open up the room a bit. It's crazy what a little paint and new flooring can do for a room! I'm just proud that we actually did something with the master bedroom. In our last place, we hated how the room looked but never bothered to change anything about it. I'm discovering how nice it is to come home after work to a place where you feel really comfortable and happy. Next steps - decorating! 


Home before tour: our 1970s ranch

Friday, June 19, 2015


I realize that it's been a little bit since I posted. Let me catch you up a bit. Kace and I sold our house north of Phoenix and moved south into the city. He started a new job in south Scottsdale back in October and the commute was brutal. Eventually we had enough and realized we weren't quite ready for the suburbs. 

After some frantic scrambling and looking for houses after we sold ours, we ended up in a wonderful older Phoenix neighborhood in a 70s ranch. It had been updated in the early 2000s and while it needed a bit more care, it has a ton of potential to be the exact kind of house were were looking for. The house has a fairly open concept, which I really like. Our last house was very segmented, and I love how everything flows here. The previous owner was a single, middle aged man who's style was very different from ours, but we loved the bones of the house. I can't wait to start working on it!

Sorry for the quality of some of the photos. A lot of these were quickly snapped as we walked through the house to buy it and they're the only true "before" photos that we have since I started painting pretty much the instant we had the keys.


I loved the etched glass front door, but the bright red entryway and yellow living room were a bit much. This was the house when we saw it for the first time. 


The living room is long and skinny, which will make for some interesting furniture arranging. The yellow paint doesn't look that bad here, but the paint in the entire house was in such rough shape that it needed a new coat, and the room looks so much cleaner white. It also didn't go with all the red and blue on the other walls.  


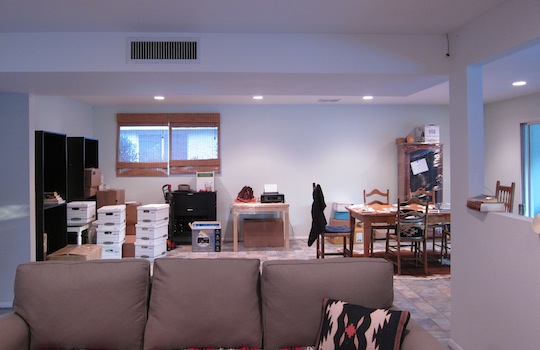
This picture was taken from the wall in the previous picture where the owner had the tv mounting. The living room opens up into the dining room behind it. The cut out wall on the right side of the photo is the kitchen. I wish I had a good picture of what this looked like before we moved in. There was a giant pool table and a kegerator sitting there. You can't really tell from these photos, but the walls are light blue. Again, the color wasn't bad but they were scuffed so bad that they needed to be painted. 


The dining area opens up into a sunroom and the kitchen. We lived half unpacked like this for much longer than I wanted due to delays in reflooring the master bedroom. Well, actually it still looks like this. Baby steps people, baby steps. 


The sunroom. 


The house has a galley kitchen, which isn't something I would have picked out for myself, but I'm absolutely loving it. Also, those windows open up to the patio outside and were a huge selling point of the house! Along with the built in wine refrigerator. (Not even joking...is that bad?) 


This is the master bedroom. It's really dark, the carpets were disgusting (I don't even want to know what all the brown spots were), and that fan is way too large for the room. We're in the midst of redoing the floors, painting, and updating to freshen everything up a bit. 


Lastly we have the guest bathroom, which I sort of love. It's outdated and has this crazy mosaic countertop, but it's kind of retro and I have no problem with leaving it for now to work on other aspects of the house. I love that built in vanity! It's also huge for a guest bathroom, which is good because we've been using it while the master bedroom has been out of commission. 

There are also 2 guest bedrooms and the master bathroom, but those are all buried under mounds of furniture and boxes that we haven't been able to unpack yet. Once those get cleaned up to a somewhat presentable state, I'll share those. But don't get too excited, they're just basic guest rooms with 4 walls and a window and closet :-)

Design Loves - Round Mirrors

Thursday, August 28, 2014

{1, 2, 3, 4, 5, 6}

We've been talking a lot about books and travel on here lately, so as Monty Python would say - now for something completely different! We moved into our house over a year ago and I've been meaning to buy a mirror to put over my dresser. I still haven't gotten around to it, which means I have to walk into the bathroom whenever I need to put on my makeup or check if I have food stuck in my teeth. (Insert sarcastic "oh no, what a nightmare!") It's not a big deal except when my husband is using the bathroom and then...well I'd rather not. So I really would like to get a mirror. I've held off buying one partly because of laziness and partly because I just didn't know what I wanted. However, I'm sort of in love with these round mirrors. Slightly retro, slightly modern, and super simple. I think I might be on the lookout for one of these in the future.

Office Space

Tuesday, July 22, 2014


Since I've decided to wait to paint the kitchen cabinets until it's cooled to less than 110 degrees I've been trying to figure out what to work on instead. The easiest room to start changing is my future office/craft room, which is currently the junk room. Yeah, I'm really excited to get that cleaned up and actually functioning! I'm envisioning a calm retreat where I can go and hide when the rest of my house is a disaster. I'll probably have to invest in a lock though to keep Kacey and all his random stuff out of there (I kid!...sort of) I'm really liking the clean, modern look of these offices with just the right pretty feminine touches.


{1, 2, 3, 4}

Painting Oak Cabinets - Part 2: The Fall...maybe?

Tuesday, July 15, 2014


Remember back when I was so excited to paint the guest bathroom cabinets? It went so smoothly and within a few days I had practically brand new cabinets. On that high I jumped right in and decided to paint our master bathroom cabinets as well. And that's where the circle of insanity started. But first let's take a quick look at where we were a year ago.


Yuck yuck yuck. Brown walls, towel racks falling off the walls, and those oak cabinets. But then we painted! And it was infinitely better! But those cabinets still mocked me.


And they continued to mock me, even throughout the painting process.

It all started out fine, I even got Kacey to sand down everything for me (yay for Tom Sawer-ing out the work!). The cabinet base was primed and painted pretty quickly, but it all went downhill with the drawers and doors.

In the few weeks between painting the guest bathroom and the master bathroom the outside temperature decided to rise about 20 degrees. Full blown Phoenix summer was in full swing at 115 degrees at 6pm. I had been painting the doors in the garage, which now became a human sized oven a la Hansel and Gretel. But instead of being inside a delicious candy house, I was stuck painting as quickly as I could to try to prevent the paint from drying as soon as it touched the wood. Since I could only stand to be outside for 10 minutes at a time, this went on for days. It stretched into weeks. I wanted to break the doors in half from my fury, but that would have left me with no doors and a messy bathroom with nowhere to hide my stuff.

Eventually I put the last coat on the front of the doors and Kacey helped me screw in the hardware. Are the new cabinets amazing and make our bathroom look 1,000,000 times better? Yes. Was it worth it? Uhhhh, not sure yet, ask me in a few months when I've stopped cringing every time I go into the garage. (But yes, it was worth it, absolutely.) For now though, let's forget about those times and instead bask in the glow that is non orangey oak cabinets. I'm sort of giddy when I look at how far this bathroom has come!


Linking up with Inspire Me Please - Linky Party 

Home Tour - Before Pictures

Monday, March 17, 2014

 I've had a few friends and family back in the midwest ask for photos of my house after we moved in, and I realized that I never really posted any. I'm not sure if they read my blog (if you do, hi!!) but since I'm prepping the photos for Facebook, I figured I'd post them here as well. This way I/you can see the changes as we make them. Things already look a bit different in some of the rooms, but here's what the house looked like before we started attacking it with paint and decorations.

The Kitchen:


I know I just said that these pictures were going to be after our stuff was in it, but our kitchen is always such a disaster that you get the empty pre-move in photos instead. You've got your standard tile floors for down here, nice granite counter tops, and terrible oak cabinets with no hardware. At some point I'd like to either stain or paint the cabinets and add hardware. I can't even tell you how many times I've accidentally bent my nail back to excruciating pain trying to open the cabinets. 

The Living Room:


Here was our living room before we painted it and rearranged the furniture. As you'll see, this is our second attempt at changing that brown paint color that covers the entire house. You'll also see how Sitka still won't let me move her couch. 

The "Library":


This is the random room that connects the living room and the kitchen. We think it was originally supposed to be a dining room but it's carpeted. And I'm certainly not going to tempt the carpet cleaning gods by eating in there every night. Instead we're planning on turning it into our books and booze room. It already looks different than when I took these photos, and I'd like to make it look more complete at some point this year. 

The Master Bedroom:


This is a bit embarrassing, but this is still exactly what our master bedroom looks like. With limited time and funds we chose to focus on rooms that others would see instead of our own bedroom. And while I'd love to turn this room into a sort of sanctuary that I love to escape to after a busy day, honestly it's probably going to stay like this for a while. I don't even know how I want to decorate it.  But seriously, get a mirror for your dresser, girl! Or at least a bedskirt. Maybe a headboard? Sheesh. 

The Master Bath:


Ah, the first thing we changed in the house! You can see the after photos here. The gray is SO MUCH BETTER than the tan it originally was. I still want to paint the cabinets white, add silver hardware, frame in the mirror, and get a new lighting fixture but that's in the distant future. I've got other fish to fry before that. 

The Craft Room/Future Office:


Another embarrassing room that I just close off so no one can see it. Right now, this room is storage for stuff we don't know what to do with/things we haven't organized yet. Someday this will become my office & craft/sewing room and it will be glorious. This might be the next room on my list. 

The Guest Bathroom:


This is the bathroom between the two guest rooms. It is what it is. Again, more ugly oak that I want to stain or paint some day, but that's not even on the radar at this point. 

The Guest Room:


Also a work in progress (we actually have a bed skirt on the bed now!) but still needs a long way to go until it becomes the comfy, welcoming guest room that I envision. Right now, it's a hodgepodge of storage, a bed, and Kacey's stuff.  


So that is/was how our house looked after we moved all of our stuff in. It's funny looking back at these pictures because the house already looks fairly different. I can't wait to keep making the house more "us" and turn this tract home into something that fits our personalities. Basically I want the library from Beauty and the Beast and the wine cellar from The Parent Trap, is that too much to ask? Probably. But I'm still pretty excited to see how different the house will look once we're done with it!

Fun Reading Nook Update

Thursday, February 20, 2014


Quick fun fact for today - I was featured with a few other bloggers on an article by One Kings Lane featuring reading nooks! By the way, did you know they had a whole section devoted to articles on decor and furniture? They discuss the history of furniture, how to guides, and decor inspiration. How fun is that?! I may have spent a few hours indulging the history nerd in me and reading up on the background of sofa styles.

DIY Rustic Wooden Fence Board Headboard

Monday, February 17, 2014


I fell in love with all those reclaimed wood projects on Pinterest -especially the headboards. However, having moved from the land of barns to the land of cacti I no longer have access to any perfectly weathered gray barn boards to make fun projects. So instead, I decided to make our headboard a little more tailored looking, but still retain the rustic feel that you get from the reclaimed wood. Enter the cedar fence slats. They're light, the perfect thickness, and easily cut down to size by your handy Home Depot or Lowe's worker (or yourself if you can work a saw. We don't have one, hence the help from employees). 

Materials for a queen size bed:
6 cedar fence slats from Home Depot - have them cut to 63" long
2 two by fours for the legs - have them cut to 48" long
1 one by four cut to 32 inches for the center brace (or 1 inch shorter than the total height of the boards)
nails
wood glue 
Minwax Water Based Pre Stain Wood Conditioner
Minwax Water Based Stain in Toffee
Ploycrylic Protective Finish
Rags for wiping stain on and off
Paint/foam brushes


 Start with the boards cut to the size you need. For a queen size bed, the length of my boards was 63 inches. We sanded them all down to remove any splinters. This can either take a few hours if you have an electric hand sander, or a few weeks if your husband won't let you buy one and promises to sand them all himself and then keeps forgetting. Ahem. Three weeks later I took a hammer to some of boards to give them that beaten, weathered look that you just don't get from new cuts of lumber.

Note - the boards I used are cedar fence slats. Cedar smells. I happen to love that smell but if you don't, you might want to think about using a different type of wood. It's been in our house for 6 months now and every time you enter the room you can still detect a faint woodsy cedar scent. Like I said, I love it because it makes me think of forests and the outdoors. But it doesn't go away quickly, so make sure you're ok with that!


I used a water based stain for this project since I have a fear of mineral spirits and don't want to use it to clean up regular wood stain. Minwax has a water based stain that comes as a clear tint and you add the color like you would a regular can of paint. I think it worked great and I had no trouble using it. I used the Pre-Stain Wood conditioner on the wood first to give it an even finish. I didn't use this on the headboard legs since they wouldn't be seen, and you can definitely tell the difference between the boards where I used the pre-stain and where I didn't. The boards had a much cleaner and even coloration when I used the conditioner first. 


I used 2 coats front and back of the "Toffee" color. After everything dried I finished it with a topcoat of Ploycrylic to protect and seal everything. Stain the slats and the 2 boards for the legs. I also stained the center brace because why not? This was my first time staining anything and I just followed the instructions on the cans. It worked beautifully.


Once everything dries it's time to assemble. Lay the boards out how you want them to go. Mine didn't line up perfectly, but I liked the warping and thought it added character. If you want yours to lay perfectly, check how the boards fit at the store before you buy them. 

Once everything is lined up, flip each of the boards over so the back of the headboard is facing up. Run a line of wood glue along the center brace and place perpendicular to the slats in the center of the board. Stack something heavy on top to weigh it down until the glue dries. See the photo below? The brace is under the middle bag of charcoal. My husband we have a lot of charcoal. Also, random dumbbells. 


Here's where it gets tricky. I wanted to nail the boards to the legs from the front so I could line up the nail heads. To do that, before I flipped the board back over, I lined up the legs and marked with chalk where I wanted the lowest board to land and made sure everything was level. Then I turned the whole thing over and slid the legs underneath, lining up the lowest board with the chalk marks. 

Note - I measured my bed frame and figured out exactly how far apart the holes were to screw in a headboard. If you don't want to screw the board directly to your frame, it's less important where the legs of the headboard go. 


Once I had the boards lined up, I nailed each of them to both the legs and the center brace. Then all that's left to do is screw it into your bed frame or attach it to the wall!

I absolutely love how it turned out, and I think I'm going to do it all over again to make a headboard for our new bed. It'll probably only take me another year or so.


Little Library Nook

Tuesday, January 28, 2014


While we're on the topic of seating areas, I wanted to set up a little temporary reading nook until we can get the library done. (Again, it's not so much an actual library as a carpeted dining room that we're converting. Seriously, who puts carpeting in a dining room?) My grand dreams include a built in floor to ceiling bookshelf system, a few comfy chair, a side table, and a fully stocked bar. But in the meantime (and until we figure out how to build bookshelves and win the lottery) this little corner will do nicely. 


Originally I wasn't sure what kind of chairs I wanted for the library. My first instinct was a comfy lazy-boy style recliner, even if it's not the prettiest piece of furniture. But we have an old one that was handed down to us and I hate that thing with the fire of a thousand suns. Dramatic much? But seriously, the leather squeaks at every miniscule movement you make while sitting on it, it sticks to your thighs in summer, and is freezing in the winter. Plus I always feel like I'm sliding off it. So I poked around online a little bit to see what was out there, checked out the Chair Style Guide on One King's Lane, and realized that I kept being drawn to chairs with a bit more tailoring. 

I really like the Parsons chair style (and someday dream of having an actual dining room - with hardwood floors!- with Parsons chairs around the table) but I just didn't think that worked for a cozy little reading nook. Because above all else, comfort is my number one requirement when it comes to my furniture. It can be the prettiest/stylish/most trendy sofa or chair in the world, but if I can't curl up on it for hours then no thank you. This especially holds true for reading furniture. I take my reading furniture probably too seriously. 


I think this chair fits the bill for now, it's streamlined and has that modern look, but it's actually very soft and comfy. I'm really into the woodsy meets western look right now (it reminds me that it's winter in the rest of the country even though it's like 70 here and I just had coffee on my patio. Yeah you can hate me now...) and I like how the herringbone pattern goes with the rug and the simple style of the table. We'll see how it holds up after a several hour reading marathon. And while we're talking about decor, you know how in magazines and styled home photos everyone's bookshelves are half empty and styled beautifully with photos and trinkets? Yeah, this is my bookshelf - full to the brim with books and then some. No pretty styling here, and I wouldn't change that for anything. 

(Also, I may have overused parentheses in this post.) 

(PARENTHESES!!!)

Living Room Redo: Step 2 - Seating

Thursday, January 23, 2014


Last week we took the living room from beige and drab to white and bright. This week we're adding some color and seating so that I don't have to sit on the floor whenever we have more than 3 people over. And yes, it's still Christmas in these photos. And yes, this is still exactly how my living room looks because I haven't taken them down yet. (What? I've been in China!) 


We finally broke into the wedding money and bought our first non Ikea or hand me down couch. It's amazing. It's from Pottery Barn and is made from this gorgeous linen/cotton blend fabric. It holds up well from the cotton, but has the texture and look of linen. I may have been standing in the store drooling for a while when I first saw it. We went with a very classic silhouette. Although we both really like the mid century look that's coming back in, we wanted something that won't go out of style in a few years. And it had to have comfy armrests so I can lay down and watch tv on it. Those were really my only requirements. I was also really pleased that we got a good deal on this because holy cats nice furniture is expensive! Yay for sales and discounts!


Aside from Alastor Moosey (who we moved from over the front door to over the library so he can still pop against a background), the rug is probably my favorite thing in this entire room. I've been eyeing kilim rugs for months, but just couldn't justify the cost. I also wanted a giant 7x10 or larger rug and those run into the thousands of dollars. Yeah that's out. So I scaled back and started looking for a smaller baluchi, persian, or kilim rug as a runner underneath the coffee table. I ended up snagging this guy for a great deal from Overstock.com on Black Friday. I love it and it adds a great pop of color to an otherwise very neutral room (I'm afraid of colors when I decorate because I keep changing my mind. Colors are a commitment, and changing gets expensive.)

So that's how our living room looks now! We still have a large blank wall behind the chairs that I need to fill with something, but I'm waiting for the perfect piece of artwork. I also want to add something above the front door once I take down that wreath, but that's TBD as well. I absolutely love how it turned out. For the first time in my adult life, I actually have a room that feels like us. No more half heartedly decorating apartments knowing we'll leave in a year. This was the first time I actually was able to sit down and think about how I wanted this room to reflect me and my husband, and then actually do it. It still needs some tweaks here and there, and at some point we'd like to replace the entertainment center since it got a bit destroyed in all the moving. But that's not urgent. For now, I'm declaring this room finished!


Sitka approves of all this as long as I don't touch her couch. Yeah, we lost the no dog on the furniture battle. So instead we shaved her.  Much less dog hair!
Proudly designed by | mlekoshiPlayground |