Showing posts with label recipes. Show all posts

Healthy Raw "Cookie Dough" Snack Bites

Wednesday, September 3, 2014


I'm going to admit something - I love raw cookie dough. Yes, I understand that supposedly it could be contaminated with salmonella from the raw eggs, but I just don't care. (Unless I get salmonella, then I'll probably kick myself for eating all that dough.) Once when I was in grade school, my best friend and I made cookie dough for the sole purpose of eating it raw. We took it upstairs with us, had a great sleepover, and left it out overnight so we could eat it for breakfast the next morning. Needless to say, my mother freaked out when she realized we were eating raw cookie dough which contained eggs and butter that had been sitting out all night. (We were fine, and it was delicious.) 


Unfortunately, consuming large amounts of unbaked cookie dough is probably really bad for you. Luckily, this recipe sort of gives the taste and texture of cookie dough, is really tasty, and is pretty healthy! 

These snack bites are made of ground nuts and oats, and sweetened with honey and cinnamon. Throw in a few chocolate chips and it's basically a healthy uncooked cookie!  I love taking a few of these to work with me and eating them during the afternoon lull where I'd normally fill up on chips or actual cookies. It tastes like you're filling up on junk food, except you're actually getting a protein boost from all the nuts. Much better than a bag of Cheetos (although I do love me some Cheetos). 


Ingredients:
1/2 cup almonds
1/2 cup walnuts
1/2 cup pecans
1/2 cup oats
1/2 teaspoon ground cinnamon
1/8 teaspoon salt
1/4 cup honey
2 teaspoon vanilla
1/4 cup chocolate chips

Directions:
Mix the almonds, walnuts, pecans, oats, cinnamon, and salt in a food processor until ground to a meal. Add the honey and vanilla and pulse to combine. Add the chocolate chips and pulse again until just mixed together.

Drop a tablespoon of the dough onto a cookie sheet lined with freezer or parchment paper. Wetting your hands will help the dough not stick to you. Freeze for an hour to harden and then store in an airtight container in the freezer.

Note - I'm using the word "raw" in the generic uncooked way, not the specific Raw Diet way. I don't know much about the Raw Diet, but I'm sure this recipe could be altered to fit the requirements and become a raw Raw cookie dough snack.

Mexican Spiced Egg Muffins

Tuesday, July 8, 2014


Do you ever not eat breakfast because you're running late for work and it's all you can do to make sure you have pants on, much less eat a wholesome breakfast? Is that just me?

After the third straight day of eating a bag of dry Cocoa Puffs in the car during my commute I figured it was time for a change. (Note, that change was not to stop buying Cocoa Puffs.) What started as an attempt to be an actual adult and eat more than sugar coated flour turned into one of my favorite grab and go breakfasts - the infamous egg muffin! Ok, so I have no idea what these are actually called, so I'm sticking with egg muffin. You basically make omelets in a muffin tin and then store those little buggers in a ziplock bag in the refrigerator and eat them all week long. A-freaking-mazing.

These ones have a Mexican flair to them with barbacoa, chili powder, garlic, and oregano and are lip smackingly tasty. I wish I had one right now, but alas, I made these last week and they're long gone. They're easy to make and extremely addictive.

First, whisk your eggs and milk together and add the spices.

I used prepackaged barbacoa (spiced shredded beef) from my grocery store, but you can use any shredded meat. Chop up the onions and kale.

  Then layer away! I start with the meat, then the onions, then the cheese, and lastly the kale.

Pour the egg mixture over everything. I find a soup ladle makes this much easier. 

Bake in the oven for 15-18 minutes and eat them all!!!

These hold up very well in the fridge and are just as good the next day (and the next) after being heated in the microwave for 30 seconds. A much healthier alternative to Cocoa Puffs.

Recipe:
8 eggs
1/2 cup milk
2 TBS oregano
2 teaspoons chili powder
1/4 teaspoon cumin
1/4 teaspoon paprika
1/2 teaspoon garlic powder
1 teaspoon onion powder
salt and pepper to taste
Barbacoa (or any shredded beef, pork, or chicken)
shredded cheese (I used cheddar)
1/2 onion
1 bunch kale
Optional - salsa for topping

- Preheat oven to 350
- Whisk eggs and milk together, add spices. Chop onion and kale - enough for each muffin cup to hold a few pieces
- Spray muffin tin with nonstick cooking spray
- Layer meat, onion, cheese, and kale into each muffin cup
- Pour egg mixture on top of meat/veggies
- Optional - top each cup with a spoonful of salsa 
- Bake for 15-18 minutes
- Let cool slightly then remove from tin. Eat immediately or store in an airtight container in the refrigerator. To reheat, microwave for 30 seconds

Amazing Crock Pot Pork Chile Verde

Friday, March 7, 2014


So I never really got into mexican food until I started dating my now husband. I have him to thank for my love of pork. I mean I was all about bacon, but there is SO MUCH MORE. Like chile verde, which is my new favorite Mexican food, ever. I've never quite been able to recreate restaurant style perfectly myself. But this one gets pretty stinking close, and I'm pretty sure I could eat this every day of the week. It's a little more time-intensive than throwing a pork shoulder into the crock pot with a can of green enchilada sauce, but SO  worth it!
Ingredients:
3-4 lb pork boneless pork shoulder
10 tomatillos
1 jalepeno pepper
1 poblano pepper or can of mild chiles
1 yellow onion
4 cloves garlic
1 green bell pepper
1 cup fresh cilantro chopped (optional)
salt and pepper to taste
2 tbsp oregano
1 tsp cumin


Brown the pork shoulder and place in the bottom of a crockpot. Then brown onions in same pan and add them on top of the pork in the pot.


Peel, wash, and half the tomatillos. Place cut side down on a tinfoil covered cookie sheet with 4-5 cloves of garlic with the skin on. Broil for 5 minutes until brown.


Remove seeds from the jalepeno, bell pepper, and poblano pepper and chop. Add all peppers to a blender/food processor. Remove the skin from the garlic and add to the blender along with all the tomatillos. Blend until it creates a smooth sauce. People have very polarized opinions about cilantro. If you like cilantro (yes!!!) add that in and blend again. If you don't - just skip this step. I added a cup of chopped cilantro to the blender along with the oregano, cumin, and a dash of salt and pepper. Blend again until smooth.


Pour mixture over pork and onions and stir so the sauce gets down to the bottom. Cook on low for 8-10 hours.


What comes out of the crock pot is amazing fall-off-the-bone pork deliciousness with the perfect mix of slight spice and tanginess. It looks like green mush, but it tastes SO MUCH BETTER. It takes a better photographer than me to make it look nice, but trust me, for what this lacks in photogenicity (is that a word?) it makes up for in taste. Add rice, beans, and a taco or tostada shell for a meal. And now after looking at all these photos I think I need to go make this again.

Spinach Bianca Lasagna

Friday, November 8, 2013


So apparently it's cold in the rest of the country? It's finally beautiful here, mid 80s during the day and 60s at night (and this, my friends, is why I moved to Arizona). It's finally cold enough to start thinking about warm comfort foods. For a somewhat healthier take on casseroles and lasagna, I like making a white lasagna so I can feel healthy eating spinach and chicken, while really I'm in it for the 3 cups of cheese. Whatever. 


Ingredients:
2-3 chicken breasts
1 package of no boil lasagna noodles 
1 small bunch of green onions
1 bunch of spinach 
6 cups chicken broth 
3 cups of grated mozzarella 
salt and pepper to taste

Preheat the oven to 400 degrees.

Start by cooking up the chicken in a frying and shredding it. 

Put a layer of lasagna noodles on the bottom of a 9x13" pan. Then layer, layer layer. Start with a layer of chicken and sliced green onions, then add a layer of spinach, and then mozzarella. Top with a sprinkle of salt and pepper and then add 3 cups of chicken broth.

Then repeat - chicken and onions, spinach, mozzarella, 3 cups of broth. You may not use all the broth. You want the broth to completely cover the upper layer of noodles or they'll get hard and crispy/chewy which isn't what we're going for.  Bake in the oven for 30 minutes covered with tinfoil. Remove tinfoil for the last 10 minutes to make sure the cheese is a melty golden brown.

Remove from the oven, spoon into a bowl, and eat your heart out. Mmmmm, cheesy goodness. 

Vegetarian Spring Rolls

Tuesday, July 16, 2013


Spring rolls have always intimidated me. Well, making them - eating them has never been a problem. Something about actually having to roll various ingredients together just scared me away. And rice paper, that stuff is just a disaster waiting to happen. Or so I wrongly thought. After trying these, I'm not sure why I was so afraid. They're ridiculously easy to make once you get past all the vegetable chopping. (So. Much. Chopping.) And they're completely customizable, leaving you free to put in whatever veggies you like. I made these vegetarian, but shrimp or chicken is fantastic in here as well. 


Vegetarian Spring Rolls:

rice papaer 
1 large carrot
1 large cucumber
 radishes
 green onions
1 cup bean sprouts
sprigs of: cilantro, basil, and mint
optional - rice vinegar or sesame oil 

First things first - cut up all the veggies. I used a vegetable peeler to create long strips of the carrot and cucumber (easier to fit in the wrapping), and just cut the radishes and green onions. Wash the raw bean sprouts and leave as is. 

Now the slightly tricky part. Take a frying pan and fill it with lukewarm water. Working with one sheet at a time, dip the rice paper into the pan until it is completely submerged. You only want to leave it in for a few seconds. The paper will still feel pliable and thick, but it will become soft and more gelatinous as it sits while you put in the filling. Once it's been dipped in the water, lay it on a flat working surface. I used a clean kitchen towel since apparently the rice paper will stick to wooden cutting boards. 

 Then add the vegetables and herbs to one half of the paper. Gently fold over the paper, tuck the sides in, and continue rolling. The rice paper will be sticky and should stay rolled if you press it together gently. This is actually way easier than I thought it would be. 

For a bit of extra flavor, you can put a few drops of rice vinegar or sesame oil on the vegetables before you roll them up, but these are fantastic on their own. I'd recommend a dipping sauce though - either peanut sauce or plum sauce is amazing. 

So there you go, a bit labor intensive, but ultimately waaaay easier than they look! 

Mini Enchilada Bites

Monday, January 28, 2013


Mexican food has never been my forte. But when my brother came home from college in Arizona over Christmas and asked me to make some type of Mexican dish for Christmas Eve, I had to try something. These mini enchiladas were a big hit, but incredibly tedious to make. Still, they're a great appetizer for a party and can be made as mild or spicy as you want.


 I used this recipe for mini enchilada cups, but used flour tortillas and adjusted the amount of beans, chicken, and cheese that topped the cups. We served them with salsa and guacamole as toppings and they disappeared in a matter of minutes!


Truffled Mac and Cheese with Cauliflower

Thursday, January 3, 2013


I was introduced to truffle oil a few years ago but since it's a bit pricey, I hadn't thought of actually buying some myself. Then I found a little olive oil shop nearby that had it at a reasonable price, so I snatched it up. I'm in love with the recipe. It's definitely one of those so not healthy, but oh so good comfort foods. But to make it a tiny bit healthier, I've added some chopped cauliflower which you can't even detect since the flavor and texture meld so well into the cheesy pasta. 

1/2 head of cauliflower, chopped
12 oz cavatappi pasta
1/2 onion, chopped
1 clove garlic, minced
4 tablespoons butter
2 cups milk
1/4 cup flour
1 cup swiss cheese, shredded plus more for topping
1 cup cheddar cheese, shredded
1/3 cup panko bread crumbs
2 tablespoons truffle oil


Cook pasta and cauliflower together until pasta is al dente, drain, and set aside in a pot or large mixing bowl. While pasta is cooking, saute onion and garlic in butter until brown.


Add milk and flour to the pan and whisk until there are no flour chunks and bring to a boil. Remove from heat, add the truffle oil and the cups of cheddar and swiss cheese and mix well until the cheese is melted.  


Pour the mixture over pasta and cauliflower and mix, then pour into a 13 by 9 inch baking dish.


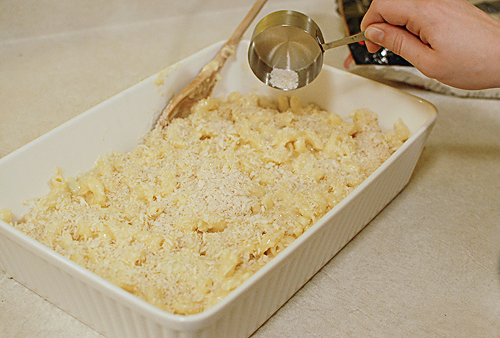
 Top with the panko crumbs and a sprinkling of cheese. Broil for 3-4 minutes until the top is brown and crispy.  Remove from oven, wait until it's a bit cooler, then stuff your face. You can thank me later. 


Cherry Vanilla Apple Butter

Monday, October 29, 2012


A few weeks ago when Kacey and I went to the apple farm we bought a peck of apples to make, well, something. I've never made apple butter before so I thought, why not? Let's try that. However, this isn't your typical apple butter. I didn't add as much sugar as most recipes called for because I didn't want it too sweet. The cherry cider and hint of vanilla add a new layer without all the extra sugar. (By the way, I didn't realize until I made this that there wasn't any butter in apple butter. Who knew?) This is made in a crock pot, which made everything so much easier. 

Ingredients:
1 peck apples - I used Cortland
1 cup cherry cider
1 tablespoon of vanilla
2/3 cup sugar
2/3 cup brown sugar
1/2 teaspoon cloves
1/4 teaspoon all spice
2 teaspoons cinnamon


Peel, core, and quarter the apples. This is probably the hardest part of the whole ordeal. Dump the apples into the crock pot with the apple cider and the vanilla and set on low for 6 hours. Give it a few stirs now and then. If you can't fit all the apples into the pot, wait until it cooks down a bit and add the rest. See? Super easy so far. 


After 6 hours, add the white and brown sugar as well as the spices and stir well. Supposedly it will cook down to a smooth mixture, but I gave it some help with a handheld mixer. Let it sit for another 5-6 hours. What did I tell you? Still easy. 


I'm not going to go into all the details about canning, that's enough for a whole other post. Instead, here's a good set of instructions for hot water bath canning.  If the apple butter is canned and properly processed in boiling water, it'll last for months. If you don't want to go through the whole canning process, put them into clean jars and either freeze them or put them in the refrigerator and use them within two weeks. It's amazing on pretty much everything and tastes like a velvety smooth spiced apple sauce. Definitely a new favorite!
Proudly designed by | mlekoshiPlayground |